There is a specific kind of magic that happens when chocolate meets peanut butter. It’s not just a flavor combination; it’s a cultural phenomenon. I remember being about seven years old, standing in the cereal aisle with my mom, holding a jar of creamy peanut butter in one hand and a box of brownie mix in the other. I asked if I could just mix them together. She laughed and said no, but she gave me a spoon anyway. That accidental, messy, delicious experiment was my first lesson in baking alchemy.
Fast forward twenty years, and I’ve spent hundreds of hours perfecting that same chocolate-peanut butter synergy. I’ve tested cake batters, frostings, fillings, and even savory applications (don’t ask about the chili). But nothing, and I mean nothing, beats the Reese’s Peanut Butter Chocolate Layer Cake everyone always asks for. This isn’t just a cake; it’s the reason I get invited to every birthday party, office celebration, and last-minute dinner party where people bring “something sweet.”
Here’s the thing about this cake: it’s deceptive. On the outside, it looks like a sophisticated, multi-layered chocolate masterpiece. Inside, it’s actually incredibly approachable. You don’t need to be a professional pastry chef to make this. You just need to understand that chocolate and peanut butter are best friends, and once you start layering them, you’re going to want to make this for everyone you know. I’ve made this cake at least a dozen times for friends who swear it’s “too good to be homemade.” Spoiler alert: it is homemade. And it’s easier than you think.
I’ve tweaked this recipe over the years, moving from scratch-made peanut butter frosting (which is good but time-consuming) to the current version that uses high-quality peanut butter chips for that authentic Reese’s Cup flavor. The result is a moist, dense chocolate cake layered with a creamy, salty-sweet peanut butter filling, all covered in a glossy chocolate ganache. It’s rich. It’s indulgent. It’s the kind of dessert that makes people close their eyes and sigh after the first bite. If you’re looking for a dessert that delivers maximum impact with manageable effort, this is your recipe. Let’s get baking.
Why You’ll Love This Chocolate Peanut Butter Layer Cake
I’ve been baking this cake for years, and the feedback never gets old. People walk into my kitchen, see the layers, smell the chocolate, and immediately ask for the recipe. Here’s why this Reese’s Peanut Butter Chocolate Layer Cake has earned its spot as the king of my dessert rotation.
- It Tastes Like a Candy Bar Come to Life — Seriously. The combination of the fudgy chocolate cake and the salty-sweet peanut butter filling mimics the exact experience of eating a Reese’s Cup. But better. Because it’s fresh, moist, and has that homemade crumb that store-bought candy just can’t match. My kids literally compare it to their favorite snack.
- It’s Surprisingly Easy for a Layer Cake — I know, layer cakes sound intimidating. You have to worry about even layers, filling, and crumb coats. But this recipe is designed for success. The cake layers are simple one-bowl mixes (or easy scratch, depending on your preference), and the peanut butter layer is no-bake. You just whip it up and spread it. No complicated techniques required.
- It’s a Crowd-Pleaser for Everyone — I’ve served this to hardcore chocolate lovers who claim they “don’t really like peanut butter,” and they’ve gone back for seconds. I’ve also served it to peanut butter enthusiasts who think chocolate is just a sidekick. This cake bridges the gap. It satisfies both cravings in every bite.
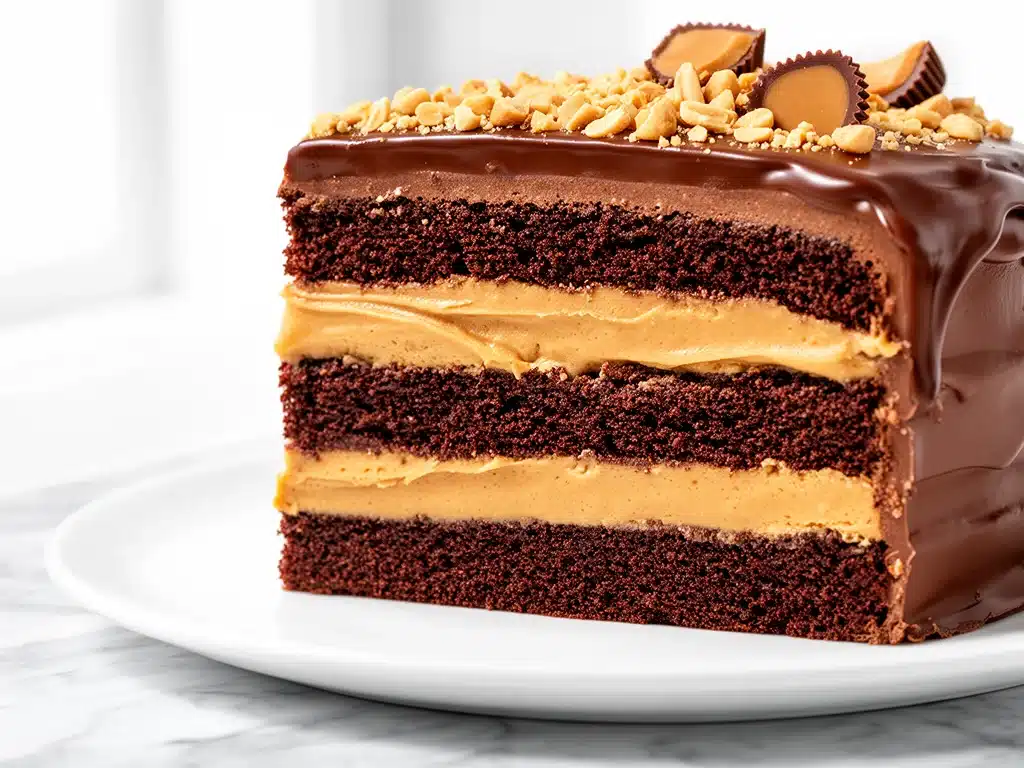
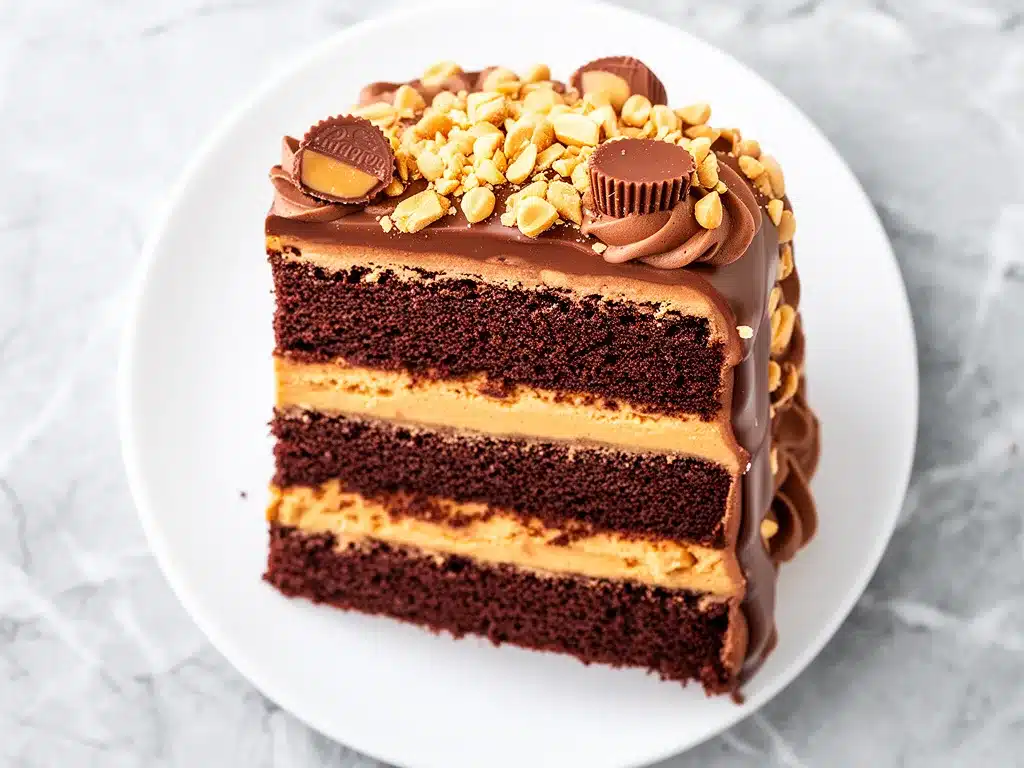
- It Looks Impressive — When you cut into this cake, you get that beautiful cross-section: dark chocolate, creamy peanut butter, more chocolate. It looks like something from a high-end bakery. Guests will assume you spent hours decorating. Truth is, the decoration is mostly just a drizzle of ganache and maybe some chopped peanuts on top. The visual impact comes from the layers themselves.
- It’s Perfect for Make-Ahead — This is my secret weapon for stress-free hosting. The cake actually tastes better the next day. The flavors meld together, the cake moistens up, and the peanut butter layer sets firmly. I can bake the layers on Saturday, frost them on Sunday, and it’s ready for a Monday party. It holds up beautifully in the fridge for days.
This cake has saved me more times than I can count. It’s my go-to when I need to impress, when I need comfort, or when I just want to treat myself to something truly special. It’s not a light, airy sponge cake. It’s a substantial, satisfying dessert that demands attention. And you’ll be happy to give it some.
Ingredients You’ll Need for the Perfect Reese’s Cake
Before we dive into the mixing bowls, let’s talk about what’s going into this cake. I’m particular about a few ingredients here because they make the difference between “good” and “absolutely addictive.” You don’t need anything exotic, but you do need quality.
For the Chocolate Cake Layers
All-purpose flour (3 cups / 375g) — The base of your cake. Don’t use cake flour here; you want a sturdy, moist crumb that can hold up to the heavy filling. I use Gold Medal or King Arthur, whichever is on sale.
Sugar (2 cups / 400g) — Granulated white sugar. This cake needs sweetness to balance the cocoa. Brown sugar can be used for a deeper molasses flavor, but white keeps it classic and moist.
Cocoa powder (¾ cup / 75g) — This is crucial. Use high-quality unsweetened cocoa powder. I prefer Dutch-processed cocoa (like Ghirardelli or Hershey’s Special Dark) because it’s less acidic and has a richer, darker color and flavor. Natural cocoa works, but the cake will be lighter in color and slightly more tart.
Baking powder and baking soda (1 tsp and 1.5 tsp respectively) — We need both for lift and to react with the acidity in the cocoa and buttermilk. Don’t skip this.
Salt (1 tsp) — Salt enhances chocolate flavor. It’s non-negotiable. Use fine sea salt.
Eggs (3 large) — Room temperature eggs are best. They emulsify better into the batter, creating a smoother cake.
Vegetable oil (½ cup / 120ml) — Oil keeps cakes moist longer than butter. Butter tastes great, but oil gives you that tender, fudgy crumb that doesn’t dry out overnight. I use canola or light olive oil.
Buttermilk (1.5 cups / 360ml) — The acid in buttermilk tenderizes the gluten and reacts with the baking soda. If you don’t have buttermilk, make your own: add 1.5 tablespoons of vinegar or lemon juice to a measuring cup, then fill with milk to the 1.5 cup line. Let it sit for 5 minutes.
Hot coffee or hot water (1 cup / 240ml) — This is the secret weapon. Hot liquid “blooms” the cocoa powder, releasing its full flavor potential. Coffee adds depth without making the cake taste like coffee. If you hate coffee, hot water works fine, but coffee makes it richer.
For the Peanut Butter Layer
Cream cheese (8 oz / 225g, softened) — Full-fat brick cream cheese is a must. The tub stuff has too much water and won’t set right. Let it come to room temperature so it mixes smoothly.
Peanut butter (1 cup / 250g) — This is where you choose your adventure. For the most authentic Reese’s flavor, I recommend using creamy peanut butter chips melted down, or a high-quality natural peanut butter that isn’t separated (or stir it well!). I often use a mix of ½ cup creamy peanut butter and ½ cup melted peanut butter chips for that candy-shop texture. Avoid chunky peanut butter in the filling—it makes spreading difficult.
Butter (½ cup / 115g, softened) — Adds richness and helps the filling set. Use unsalted butter so you control the salt.
Powdered sugar (2-3 cups / 250-375g) — You’ll need enough to reach a spreadable consistency. Start with 2 cups and add more if it’s too soft.
Vanilla extract (1 tsp) — Just a touch to round out the flavors.
For the Chocolate Ganache
Heavy cream (1 cup / 240ml) — Full-fat is essential. Low-fat cream won’t create a glossy, smooth ganache.
Semi-sweet chocolate chips (2 cups / 340g) — Or chopped chocolate bars. I use Ghirardelli 60% Cacao. It’s sweet enough to balance the cream but rich enough to taste gourmet.
Optional: Chopped peanuts — For garnish. Adds crunch and visual appeal.
Equipment Needed
You don’t need a fancy kitchen to make this cake. Here’s what I actually use.
Three 8-inch or 9-inch round cake pans — I prefer 8-inch pans for taller layers. Grease them well and line the bottoms with parchment paper. This is the #1 way to ensure your cakes don’t stick.
Mixing bowls — One large bowl for the cake batter, one medium for the peanut butter filling.
Electric mixer — A hand mixer or stand mixer works great. You can do this by hand, but it takes more arm strength.
Wire whisk — For mixing the dry ingredients and blooming the cocoa.
Spatulas — One rubber spatula for scraping bowls and spreading frosting. A small offset spatula is helpful for the ganache, but not strictly necessary.
Offset spatula or knife — For leveling your cake layers if they dome up (they usually do).
Refrigerator space — You’ll need room for the cake to chill while you assemble it. Plan ahead.
How to Make It: Step-by-Step
Alright, let’s make this! I’m walking you through exactly how I do it, including the little tricks I’ve picked up over the years.
Step 1: Prep Your Pans and Oven
Preheat your oven to 350°F (175°C). Grease three 8-inch or 9-inch round cake pans with butter or non-stick spray. Line the bottoms with parchment circles. This step is critical. If you skip the parchment, you will struggle to get the cakes out, and no one wants a broken cake layer. Set aside.
Step 2: Mix the Dry Ingredients
In a large bowl, whisk together the flour, sugar, cocoa powder, baking powder, baking soda, and salt. Make sure there are no lumps of cocoa powder. If you’re using natural cocoa, sift it to break up clumps. Whisking ensures even distribution of leavening agents.
Step 3: Combine Wet Ingredients
Add the eggs, oil, and buttermilk to the dry ingredients. Beat on medium speed for about 2 minutes. The batter will be thick. Scrape down the sides of the bowl. This step creates the structure of your cake.
Step 4: Add the Hot Liquid
Slowly pour in the hot coffee or hot water while mixing on low. The batter will become thin and watery. This is normal! Don’t panic. The hot liquid blooms the cocoa and creates a moist crumb. Mix until just combined.
Step 5: Bake the Layers
Divide the batter evenly among the three pans. Bake for 25-30 minutes, or until a toothpick inserted into the center comes out clean or with a few moist crumbs. Rotate the pans halfway through for even baking. Let the cakes cool in the pans for 10 minutes, then turn them out onto a wire rack to cool completely. Important: The cakes must be completely cool before frosting, or the peanut butter layer will melt into a mess.
Step 6: Make the Peanut Butter Filling
While the cakes cool, make the filling. In a medium bowl, beat the softened cream cheese, butter, and peanut butter until smooth and creamy. Add the vanilla. Gradually add the powdered sugar, one cup at a time, beating until you reach a thick, spreadable consistency. It should hold its shape but still be soft enough to spread. If it’s too stiff, add a teaspoon of milk. If it’s too soft, add more powdered sugar. Chill this in the fridge for 15 minutes to firm up slightly.
Step 7: Assemble the Cake
Place one cake layer on your serving plate or cake stand. Spread a generous layer of the peanut butter filling over the top, leaving a small border around the edge to prevent dripping. Place the second layer on top, then repeat with the peanut butter layer. Top with the third cake layer. Press down gently to secure.
Step 8: Make and Apply the Ganache
Heat the heavy cream in a small saucepan until it just begins to simmer (small bubbles around the edges). Pour the hot cream over the chocolate chips in a heat-proof bowl. Let it sit for 5 minutes, then stir gently until smooth and glossy. Let the ganache cool for 10-15 minutes until it thickens slightly but is still pourable. Pour over the top of the cake, letting it drip down the sides. Use a spatula to smooth the top if needed.
Step 9: Garnish and Chill
Sprinkle chopped peanuts over the top while the ganache is still wet. Refrigerate the cake for at least 1 hour (or overnight) to set the layers. This makes slicing much cleaner.
Expert Tips & Tricks
Here’s everything I’ve learned from making this dozens of times. These tips will save you from my mistakes.
- Level Your Layers — Cake layers often dome in the middle. Use a serrated bread knife to slice off the domes so your layers are flat. This makes assembly much easier and your cake look professional.
- Don’t Rush the Cooling — I know it’s tempting to frost warm cake. Don’t. The heat will melt the peanut butter filling, and your cake will slide apart. Patience is key. I usually bake the layers the night before.
- Control the Peanut Butter Consistency — If your peanut butter is too runny (common with natural peanut butter), freeze the filling for 20 minutes before spreading. If it’s too stiff, warm it slightly in the microwave (10 seconds) to soften it.
- Use a Turntable — If you have a cake turntable, use it. It makes spinning the cake while frosting so much easier. If not, just turn the plate by hand.
- Chill Before Cutting — A warm cake slices messy. A chilled cake slices clean. Let it chill in the fridge for at least an hour before serving. If you’re in a hurry, freeze it for 20 minutes.
Variations & Substitutions
Once you’ve nailed the basic version, here’s how you can mix it up. I’ve tried all of these.
Gluten-Free Version
Use a 1-to-1 gluten-free flour blend (like Bob’s Red Mill or King Arthur). The texture will be slightly denser, but it still works. Ensure your cocoa powder and chips are certified gluten-free.
Chocolate Peanut Butter Cup Cake
Instead of spreading the peanut butter layer, create “cups” in the cake layers. Use a small cookie cutter or glass to cut circles out of the center of each layer, then fill those holes with Reese’s Pieces or mini peanut butter cups before stacking. This gives you pockets of candy in every bite.
Vegan Version
Replace the cream cheese and butter in the filling with vegan cream cheese and vegan butter. Use chocolate chips that are dairy-free. The ganache can be made with coconut cream instead of heavy cream. It’s richer and has a coconut flavor, but it’s delicious.
Smaller Cake
This recipe makes three 8-inch layers. If you only want two layers, double the filling and ganache amounts, or just make a two-layer cake. The baking time will be the same.
Serving & Storage
How to Serve: I usually serve this straight from the fridge. The cold peanut butter layer is firm and delicious. Slice with a sharp knife dipped in hot water for clean cuts. Wipe the knife between slices.
Side Dishes: This cake is rich enough to stand alone. But if you want to serve it with something, a simple vanilla ice cream or whipped cream adds a nice contrast. A cup of black coffee or a glass of cold milk is the perfect pairing.
Storage: Store leftovers in an airtight container in the refrigerator for up to 5 days. The cake stays moist for days. Do not freeze the assembled cake, as the peanut butter filling can become grainy when thawed. However, you can freeze the plain cake layers (wrapped well) for up to 3 months.
Reheating: Don’t reheat this cake. It’s best served cold or at room temperature. Reheating will melt the filling and ruin the texture.
Nutrition Information
I’m not a nutritionist, but here’s the breakdown if you’re tracking. This is a rich dessert, so portions matter.
Per Serving (based on 12 slices):
| Calories | 480 |
| Protein | 8g |
| Carbs | 52g |
| Fiber | 3g |
| Sugar | 38g |
| Fat | 28g |
| Saturated Fat | 12g |
This cake is high in sugar and fat, which is expected for a chocolate peanut butter dessert. It’s a treat, not a daily snack. When I make it for my family, I cut it into smaller squares to share. It’s incredibly satisfying, so you don’t need a huge slice.
Final Thoughts
So that’s my Reese’s Peanut Butter Chocolate Layer Cake! I’ve probably talked your ear off at this point, but when you make a recipe this often, you have a lot to say about it. This cake has saved weeknight celebrations and made weekend baking sessions memorable. It’s my answer to “what’s for dessert” when I want something that feels special but is actually easy to make. My kids are happy, my husband’s happy, and I’m happy because I’m not stressed about cooking.
Make it yours! Try different toppings, swap in your favorite chocolate chips, or add a layer of caramel. The best recipes are the ones you adapt to your family’s tastes. If you make this, drop a comment and let me know what you think! I love hearing how recipes turn out in your kitchen. And if something doesn’t work, tell me that too—I’m here to help troubleshoot.
Happy baking! And I hope your kitchen smells half as good as mine does right now.
Frequently Asked Questions
Can I use a boxed cake mix?
Yes! If you’re short on time, you can use a chocolate boxed cake mix. Follow the package directions, but add an extra egg and use buttermilk instead of water/milk for extra moisture. It won’t taste quite as rich as scratch, but it’s a valid shortcut. I sometimes do this when I’m in a pinch.
Why did my peanut butter filling slide out?
This usually happens if the cake layers weren’t completely cool when you assembled the cake. The heat melts the butter and cream cheese, making the filling runny. Always let your cakes cool completely to room temperature before adding the filling. Also, chill the filled cake for at least 30 minutes before adding the ganache.
Can I make this cake ahead of time?
Absolutely. This cake actually tastes better the next day. You can bake the layers and make the filling up to 2 days ahead. Store the layers wrapped in plastic wrap and the filling in an airtight container in the fridge. Assemble and frost the day of your event.
What kind of peanut butter should I use?
For the filling, I recommend a creamy, smooth peanut butter. Natural peanut butter can be too oily and separate, making the filling runny. If you use natural peanut butter, make sure it’s well-stirred and chilled before using. Or, use peanut butter chips melted down for a more stable, candy-like texture.
Can I freeze the cake layers?
Yes. Wrap the cooled cake layers tightly in plastic wrap and then in aluminum foil. They will keep in the freezer for up to 3 months. Thaw them in the fridge overnight before assembling. This is great for meal prepping desserts.
Why is my ganache too thin?
If your ganache is too thin, it’s likely because the chocolate-to-cream ratio is off, or the cream was too hot and didn’t emulsify properly. Let it sit at room temperature for 15-20 minutes; it will thicken as it cools. If it’s still too thin, add more chocolate chips and stir until melted.
Pin This Recipe!
Reeses Peanut Butter Chocolate Layer Cake: Easy Dessert
- Total Time: 1 hour 30 minutes
- Yield: 12 servings 1x
Description
A rich, indulgent chocolate layer cake featuring a creamy salty-sweet peanut butter filling and a glossy chocolate ganache. This homemade dessert mimics the flavor of Reese’s Cups and is surprisingly easy to make.
Ingredients
- 3 cups (375g) all-purpose flour
- 2 cups (400g) granulated white sugar
- ¾ cup (75g) unsweetened cocoa powder (Dutch-processed preferred)
- 1 tsp baking powder
- 1.5 tsp baking soda
- 1 tsp fine sea salt
- 3 large eggs (room temperature)
- ½ cup (120ml) vegetable oil
- 1.5 cups (360ml) buttermilk
- 1 cup (240ml) hot coffee or hot water
- 8 oz (225g) full-fat brick cream cheese (softened)
- 1 cup (250g) creamy peanut butter or melted peanut butter chips
- ½ cup (115g) unsalted butter (softened)
- 2–3 cups (250-375g) powdered sugar
- 1 tsp vanilla extract
- 1 cup (240ml) heavy cream
- 2 cups (340g) semi-sweet chocolate chips
- Chopped peanuts (optional, for garnish)
Instructions
- Preheat oven to 350°F (175°C). Grease three 8-inch or 9-inch round cake pans and line bottoms with parchment paper.
- In a large bowl, whisk together flour, sugar, cocoa powder, baking powder, baking soda, and salt until no lumps remain.
- Add eggs, oil, and buttermilk to the dry ingredients. Beat on medium speed for 2 minutes until combined.
- Slowly pour in hot coffee or hot water while mixing on low. Mix until just combined; batter will be thin.
- Divide batter evenly among the three pans. Bake for 25-30 minutes or until a toothpick comes out clean. Rotate pans halfway through.
- Cool cakes in pans for 10 minutes, then turn out onto a wire rack to cool completely.
- While cakes cool, beat cream cheese, butter, and peanut butter until smooth. Add vanilla.
- Gradually add powdered sugar, beating until a thick, spreadable consistency is reached. Chill filling for 15 minutes.
- Assemble cake: Place one layer on a stand, spread peanut butter filling, add second layer, spread filling, add third layer.
- Heat heavy cream until simmering. Pour over chocolate chips in a heat-proof bowl. Let sit 5 minutes, then stir until smooth.
- Let ganache cool 10-15 minutes until slightly thickened but pourable. Pour over cake, letting it drip down sides.
- Sprinkle with chopped peanuts if desired. Refrigerate for at least 1 hour before slicing.
Notes
Ensure cake layers are completely cool before adding the peanut butter filling to prevent melting. For best results, chill the assembled cake overnight to allow flavors to meld and layers to set firmly. Do not freeze the assembled cake as the filling may become grainy.
- Prep Time: 30 minutes
- Cook Time: 30 minutes
- Category: Dessert
- Cuisine: American
Nutrition
- Serving Size: 1 slice
- Calories: 480
- Sugar: 38
- Fat: 28
- Saturated Fat: 12
- Carbohydrates: 52
- Fiber: 3
- Protein: 8
Keywords: chocolate cake, peanut butter cake, Reese's cake, layer cake, dessert, baking, chocolate ganache, peanut butter filling


